
I’ve created dozens of State Migration Points over the last few years, and 99% of the time, i’ve had to alter the permissions in 1 place or another to get it to work properly.
Having researched this a lot, I note there is no 1 place to say; “Set these permissions” …Until now
Preparation
By default, SCCM will use the machine account of each client to set permissions in the State Migration Point (hereby known as SMP). I’m not overly keen on this and would prefer a Service account do this instead. Thankfully, we can set SCCM to use the Network Access Account (hereby known as NAA) to do this instead. I’ve found this to be much more reliable and so this is what we’ll utilise.
1) Ensure your NAA is a member of the Local Administrators group on the Site Server that will be your SMP.
As a side note, best practice should be to have a single AD security group which contains your NAA, and the machine accounts for each site server. This security group should then be in the Local Admins group on every site server.
2) Before you install the SMP role in SCCM, create a root folder for it to sit in: “_USMT”
In this example, i’m going to create Z:\_USMT
Set its permissions like so;

Ensure ‘Include inheritable permissions from this object’s parent’ is unticked, and “Replace all child object **” is ticked.
3) Create the SMP Role
Now in SCCM, install the SMP role onto the selected Site Server.

And set the folder to the one we created earlier:

4) Check the logs
Before we jump in, its a good time to check the logs to make sure its creating our SMP Share as expected. On your SMP Server, open the SmpMgr.log

We can see here its created an SMPStore folder in our Z:\_USMT directory. Although its not quite done yet, but at this point you’re safe to proceed…

5) Finalise the permissions
There’s no pretty way to do this, so i’m just going to reel off screenshots in the order of how you should ensure yours are configured.
Open your ‘_USMT’ folder and Continue when prompted.

Open your SMPSTORE folder, and continue when prompted.

Open the properties\security of your SMPSTORE folder

Add the permissions exactly as per below, it should have inherited local admins and system from the parent but if not, add them too;
Authenticated Users = Read Attributes (only!)
Local Service = Full Control

File sharing permissions;

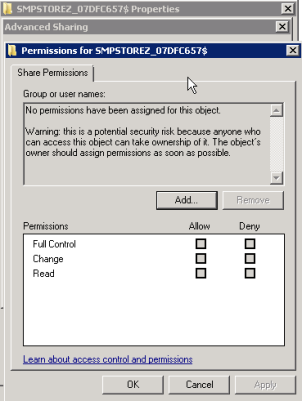
Advanced Sharing Permissions should be empty;
6) Last check on the log
Give the log file another check and you should see it has completed its configuration. Microsoft do say to allow up to an hour for this to complete and be available to clients, but i’ve generally found once the perms are set correct as per above, its good to go.

7) Ensure your USMT Steps in your TS are set to use the NAA
On both your Capture and Restore State Store steps ensure “If computer account fails to connect to state store, use the Network Access account” is ticked.

Summary
Those are the steps I follow to have a seamless, quick and secure State Migration Point, every time.
Your clients will now backup and restore, using the Network Access Account.

I hope this has helped you.
Rich Mawdsley

Hi there,I log on to your blog named “Guide – State Migration Point Creation (with the correct permissions) – Everything SCCM” like every week.Your humoristic style is witty, keep up the good work! And you can look our website about اغانى شعبى.
LikeLike
Nice post again. Great style, easy to follow. You might want to add that you need to install IIS as a requirement (if on a separate server). I’m trying to track down the exactly IIS components you need to install.
LikeLike
Thanks Andrew!
Only the pure default IIS config is required, nothing fancy.
LikeLike
Thanks. I saw some links that said the same but I had IIS errors with my install. Adding additional IIS components solved this. Not sure if this was because I was using Server 2016. Anyway the components I had to install were:
o IIS Management Compatibility
o Application Development: ISAPI Extensions
LikeLiked by 1 person
We are just getting USMT setup here at work. I tested it on three PCs. One of them everything was good right away. I logged in and all of my files, folders, and settings were there. The second PC the files didn’t show up until an hour after it finished re-imaging. The third PC still has none of the files. How/when are the files put back on to the PC? Is it possible it just takes a long time to finish moving the files? Do files continue to transfer to the PC after the entire task sequence finishes? I don’t see anything that sticks out in scanstate, scanstateprogress, or smsts logs. Thanks.
LikeLike
Hi Sean,
There certainly is no delay as such for this.
You should be running the “Capture User State” steps to backup all the files at the start of the TS, then nearer the end, using the “Restore User State” step to put it all back. Sounds like perhaps you’re missing the Restore part?
Rich Mawdsley
LikeLike
Great guide!
Setting up the security for this isn’t obvious. Thanks for sharing. If OK with you I’ll link to this article from my site?
To get more complete XML files for SCCM, consider getting the EhlerTech XML reference pack at http://ehlertech.com/customxmls/
They also have a way to migrate Windows 10 Modern UI Apps..
LikeLike